
Install Types
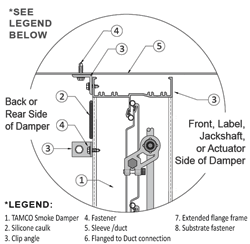
IN DUCT INSTALL TYPE
- Determine the location where the damper is to be installed inside the duct or sleeve. This location must be within 24″ (609mm) of the smoke barrier.
- Slide the damper into pre-determined sleeve or duct location. Ensure that the damper is square and true.
- Situate the clips around the back or rear perimeter of the damper frame, at a maximum of 12” (305mm) on center (oc) intervals and so they begin at no more than 6” (152mm) from the corners. A minimum of 1 clip is required per side.
- Fasten clips to the duct first and then to the damper using, as a minimum; #8 sms screws, 3/16” (4.8mm) rivets, #12 bolts/nuts, or tack welds. Clips are not required on the front (label) side of the damper.
- Run a bead of silicone caulk around the inside perimeter of the back side of the damper, where it comes into contact with the sleeve or duct. It is not necessary to caulk around the front (label) side of the damper. If caulking is applied after installation, it is recommended to caulk around all clips to minimize leakage.
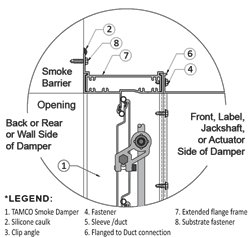
EXTENDED REAR FLANGE INSTALL TYPE (WALL MOUNT)
- Dampers should be ordered from the factory with extended rear flanges if they are to be wall mounted.
- Measure both the wall opening and the damper ID, to ensure that the two dimensions are identical.
- Run a bead of silicone caulk around the perimeter of the damper flange face, where it will come into contact with the substrate upon installation. This is to prevent leakage between the damper and the wall. Caulking may be applied at this step, or following the last step, once the smoke damper has been fastened in place.
- Place the damper in the desired location on the wall, so that the inside of the damper’s frame aligns with the edges of the wall opening.
- Secure the damper to the wall using, as a minimum; #8 sms screws, 3/16” (4.8mm) rivets, #12 bolts/nuts, ¼” (6.4mm) Tapcons, or tack welds, placed at 12” (305mm) oc intervals. Fasteners should begin at no more than 6” (152mm) from the corners. A minimum of 1 clip is required per side.
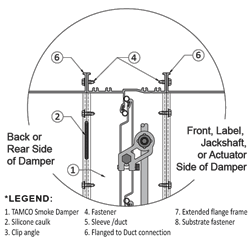
FLANGED TO DUCT INSTALL TYPE
- Measure and if necessary, adjust the duct or opening to ensure that it is true and square.
- Run a bead of silicone caulk around the inside perimeter of the flange, where it comes into contact with the damper frame, to prevent leakage at the connection point between the duct and damper frame. This step may be performed now or at the end of installation, once the smoke damper has been fastened in place.
- Position the Flanged-to-Duct mount type smoke damper, so that it is adjacent to the flanged duct.
- Secure the flanged connections together using, as a minimum; #8 sms screws, 3/16” (4.8mm) rivets, #12 bolts/nuts, flange mount system, or tack welds, placed at 12” (305mm) oc intervals. Fasteners should begin at no more than 6” (152mm) from the corners. A minimum of 1 clip is required per side.
- Documents
Tamco UL/ULC Approved Smoke Damper Installation Guidelines
Download PDF Document
Download PDF Document (French)