
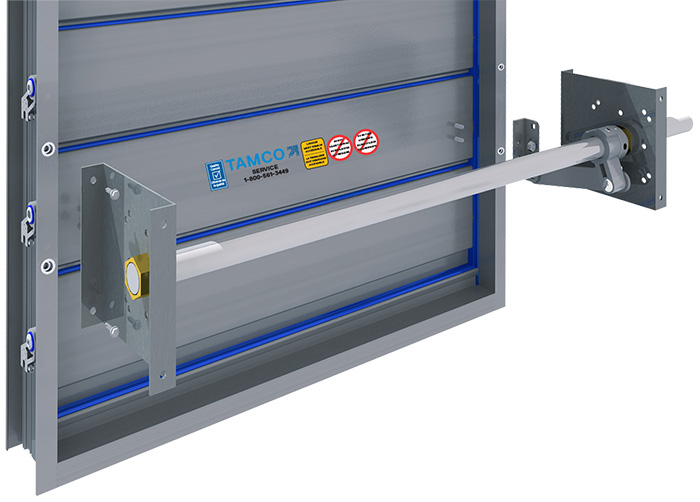
Installing Horizontal Jackshafts
Control Dampers
NOTE:
Installation design may require jack shaft rod and side bracket assembly to be fitted before damper is installed. This could occur due to lack of space between damper frame and duct work needed for fastening hardware tools.
CHECKLIST BEFORE INSTALLATION
- Ensure installed damper sections conform to TAMCO Aluminum Damper Installation Guidelines, which are included with shipment.
- Damper mounting angles should be sized to allow side bracket to sit directly on damper frame.
- If assistance is required, call TAMCO CUSTOMER SERVICE 1-800-561-3449.
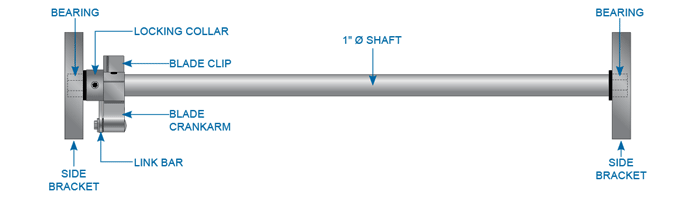
Recommendation: Do not change the factory placement of blade crank arms along the 1″ (25.4 mm) diameter shaft within the jack shaft assembly, as these are optimally aligned for connection to the U-bolts on the damper blades.
- Single Section
- Two Sections
- Three Sections
- Documents
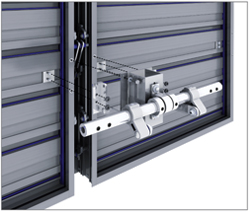
INSTALLATION PROCEDURE:
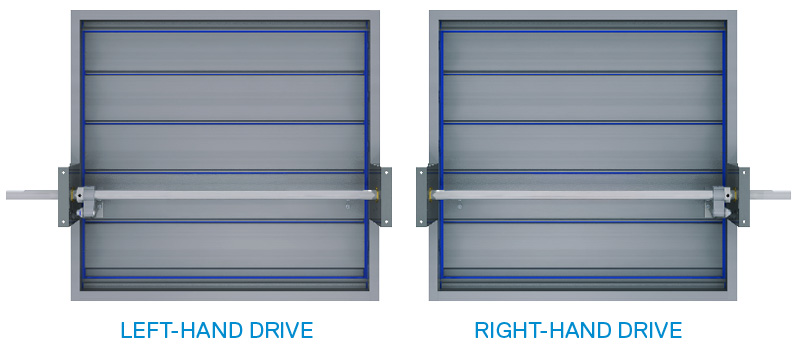
- The jackshaft assembly will be designed for either left- or right-hand drive. (Drive side must be indicated at the time of order.)
- Place the square jackshaft side brackets so that the holes align with all the pre-drilled holes on the damper frames. (All damper side frames are predrilled for accurate placement of brackets.)
- Attach the side brackets to the damper frames, using the factory-provided ¼” (6.4 mm) bolts. (Bolts are shipped fastened to the side of the bracket.)
- To connect the blade clip to the drive blade, first loosen and remove the U-bolt hex nuts found on the front of damper drive blade. It is important to ensure that the U-bolt does not fall out the back of the damper blade.
- Slide the two holes on the blade clip over the U-bolt.
- Retighten the hex nuts on the U-bolt, securely fastening the blade clip to the damper drive blade.
- Cycle the damper manually, by rotating the 1″ (25.4 mm) diameter shaft, to ensure that the damper blades seal correctly.
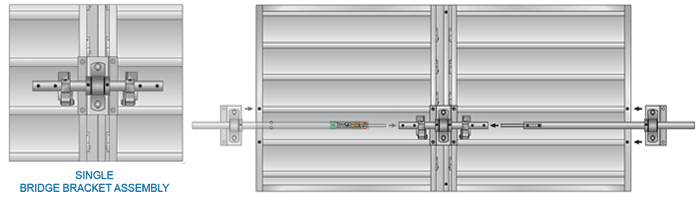
INSTALLATION PROCEDURE:
- Install the single bridge bracket assembly to damper frames where the two damper sections meet.
- Place the bridge bracket so that the holes align with all four pre-drilled holes on damper frames. (All damper side frames are predrilled for accurate placement of bridge bracket and side bracket assemblies.)
- Attach bridge bracket assemby to damper frames, using factory-provuded ¼” (6.4 mm) bolts. (Bolts are shipped fastened to the side of the bracket.)
- To connect blade clips to damper drive blades, first loosen and remove the U-bolt hex nuts on front of both damper drive blades. It is important to ensure that the U-bolts do not fall out the back of the damper blades.
- Slide the two holes on each blade clip over the corresponding U-bolts.
- Retighten hex nuts on both U-bolts, securely fastening blade clips to damper drive blades.
- Side bracket assembly can be mounted so as to drive a two (2) section damper from either the left or the right side of the damper. (Right drive installation is described and shown below.)
- The 1″ (25.4 mm) diameter shaft that is part of the side bracket assembly is supplied with an internal hexagonal rod that is used to make the internal connection to the bridge bracket assembly. Insert the hexagonal rod into the shaft within the bridge bracket assembly.
- Place the side bracket so that the holes align with the pre-drilled holes on on the right damper frame.
- Attach side bracket using factory-provided ¼” (6.4 mm) bolts.
- Tighten the set screws on both shaft segments, securing the connection between the bridge bracket and side bracket assemblies.
- Cycle the damper manually, by rotating the 1″ (25.4 mm) diameter shaft, to ensure that both damper sections seal correctly.
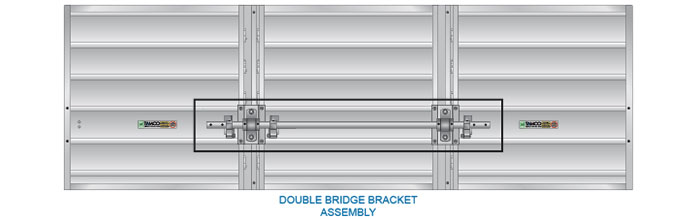
INSTALLATION PROCEDURE:
- Install the double bridge bracket assembly to damper frames where the damper sections meet. The double bridge bracket assembly comprises two bridge brackets placed along a length of 1″ (25.4 mm) diameter shaft.
- Place the left bridge bracket, so that the holes align with all four pre-drilled holes on damper frames where the left and center sections meet. Then place the right bridge bracket, so that the holes align with all four pre-drilled holes on damper frames where the center and right sections meet. (All damper side frames are predrilled for accurate placement of bridge bracket and side bracket assemblies.)
- Attach bridge bracket assembly to damper frames, using factory-provided ¼” (6.4 mm) bolts. (Bolts are shipped fastened to the side of the bracket.)
- To connect blade clips to damper drive blades, first loosen and remove the U-bolt hex nuts on front of all three damper drive blades. It is important to ensure that the U-bolts do not fall out the back of the damper blades.
- Slide the two holes on each blade clip over the corresponding U-bolts.
- Retighten hex nuts on all three U-bolts, securely fastening blade clips to damper drive blades.
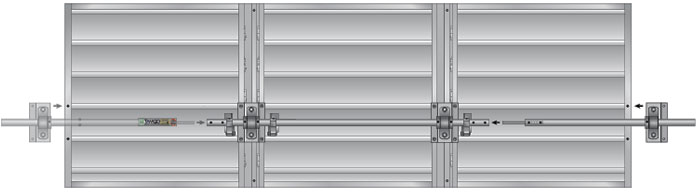
- Side bracket assembly can be mounted so as to drive a three (3) section damper from either the left or the right side of the damper. (Right drive installation is described and shown above.)
- The 1″ (25.4 mm) diameter shaft that is part of the side bracket assembly is supplied with an internal hexagonal rod that is used to make the internal connection to the bridge bracket assembly. Insert the hexagonal rod into the shaft within the bridge bracket assembly.
- Place the side bracket so that the holes align with the pre-drilled holes on on the right damper frame.
- Attach side bracket using factory-provided ¼” (6.4 mm) bolts.
- Tighten the set screws on both shaft segments, securing the connection between the bridge bracket and side bracket assemblies.
- Cycle the damper manually, by rotating the 1″ (25.4 mm) diameter shaft, to ensure that all damper sections seal correctly.
Tamco Aluminum Control Damper Installation Guidelines
Download PDF Document
Download PDF Document (French)
Damper Jumper Installation Guidelines
Download PDF Document
Download PDF Document (French)
Horizontal Jackshaft Installation Guideline
Download PDF Document
Download PDF Document (French)